


Using Fastlane to manage deployment to multiple build environments
Using Fastlane to manage deployment to multiple build environments
After researching integrating Fastlane with react-native, we didn’t find any complete articles on this topic to help with our use case. In our scenario, we wanted to have an automatic deployment of our app to TestFlight managing different build environments i.e development, testing, and production. So we decided to create our own guide. As the title suggests we will only go through setting up Fastlane to distribute an iOS beta app to TestFlight. There are a lot of other things that can be done with Fastlane, which you can learn more about on their official site.
Before Fastlane integration, we would manually deploy an app to TestFlight using Xcode. We already had three different apps setup on TestFlight, but managing three different apps or environments with the same code base was getting difficult (for the remainder of our post we will use ‘environments’ for our different apps). This means that every time we want to upload the app, we have check whether we were using the exact API URLs associated with the app. This also means incrementing the build number for an app then uploading it to TestFlight (and a lot more things). It was becoming a time-consuming task.
This guide will help those who are in a similar scenario, and want quickly get done with automating an app deployment process.
Let’s check the libraries we will be using:
1. FastLane – Fastlane official site quotes:
fastlane is an open source platform aimed at simplifying Android and iOS deployment.
fastlane lets you automate every aspect of your development and release workflow.
We will be using Fastlane for automating the deployment process of the app.
2. React-Native-Config:
By using react-native-config we can create .env files in which we will store configurations required by our different environments such as different API URLs, different app names, different build identifiers, and so on.
Installing Fastlane
1. Install the latest Xcode command-line tools:
$ xcode-select --install
2. Install fastlane using:
#_Using RubyGems_ _$ sudo gem install fastlane -NV_
_# Alternatively using Homebrew_ _$ brew install fastlane_
3. Set up fastlane by navigating to your ios folder and initializing Fastlane
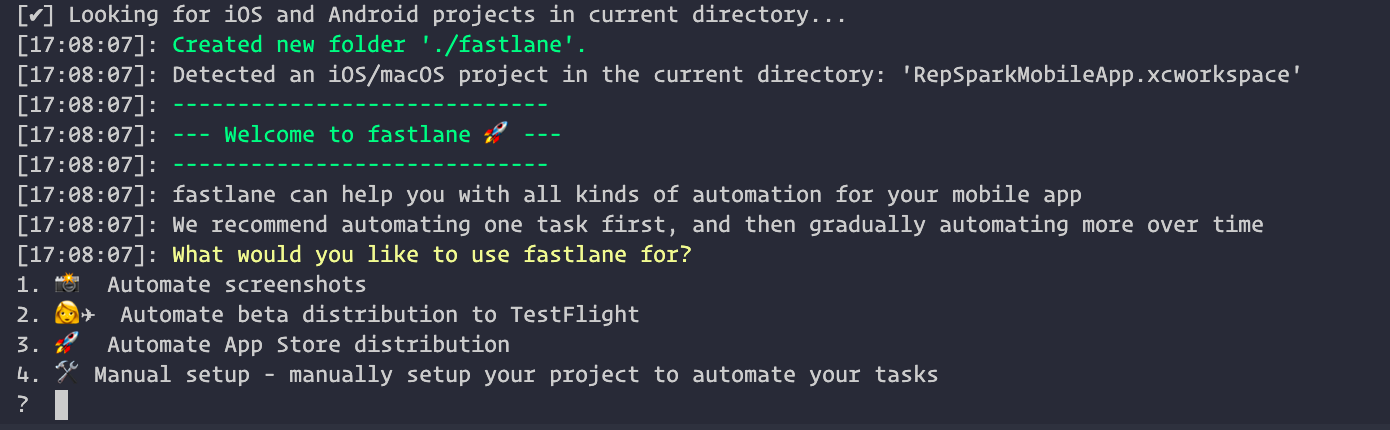
$ cd ios $ fastlane init
fastlane will automatically detect your project, and ask for any missing information.
What would you like to use Fastlane for?
After completing, you will be asked what you intend to use Fastlane for.
We will choose the second option 2- Automate beta distribution to TestFlight for this exercise.
- Then it will ask to choose app scheme
Choose your correct app scheme for this promot.

- Then you will need to enter your apple id username and password associated with the Apple developer’s account.
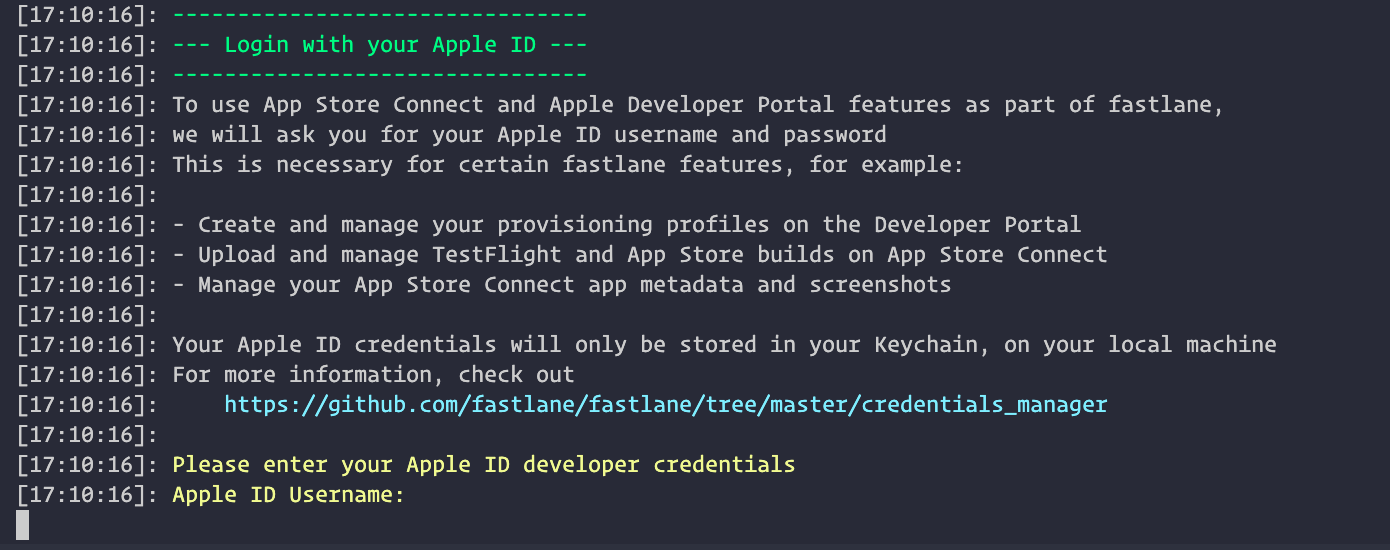
Then Fastlane will give you some information, you just need to press enter.
Once the setup is finished you will see the Fastlane folder inside your ios folder. Which contains two files, one is Appfile and another one is Fastfile.

The Appfile contains information needed to connect AppStoreConnect, so you may want to read more about the Appfile in the official docs here.
The Fastfile contains all the actions needed to upload the app to TestFlight. As we have previously selected Automate beta distribution to TestFlight, we already have a beta lane set up. We will get to the Fastfile in some time. You can read more about the fastfile on the official docs, here
Installing react-native-config
Add react-native-config to your project using the below commands:
# using yarn
$ yarn add react-native-config
# using npm
$ npm install react-native-config –save
Link the library:
_$ react-native link react-native-config_
If cocoapods are used in the project then pod has to be installed as well:
_$ cd ios && pod install && cd .._
Then you will need to create .env file at the root of your project. In our case we were managing three different environments so we have created 3 different env files i.e. .env , .env.testing , .env.production for the development, testing, and production environments respectively. You don’t have to commit these files to your git branch. Instead, you can create one example environment file with just the constants that would be used in your app.
You can add the below lines to your .gitignore so that you would not accidentally commit the environment files:
# fastlane ***/fastlane/report.xml
#config *.env .env.production .env.testing
Our env file looks like this:
ENV= #environment name of the fileAPI_HOST= #API URL of your appAPP_IDENTIFIER= #bundle identifierAPP_VERSION= #current version of appAPP_NAME= #app name #below information can be found in AppfileAPPLE_ID= #apple idTEAM_ID= #team idITC_TEAM_ID= #itc team id
Now we have created the .env files, let’s see how we can access these environment constants inside our code.
To access it in our react native code we have to first import react-native-config:
import env from 'react-native-config'
Then we can use this env variable to access constants stored in .env file:
const API_HOST = ${env.API_HOST}
Now we know we have to manage three different environments with the same codebase (different git branches). We need to have three different Xcode schemes for it. With the help of schemes, we can set different targets to build and a configuration to use when building.
You can find the default scheme in Xcode’s menu bar Product -> Scheme -> MyApp Where MyApp is the name of your scheme.
Now we will duplicate the default scheme and create two new schemes for production and testing environments. We will keep the default scheme for our local development environment.
To duplicate the default scheme go to menu Product -> Scheme -> Edit Scheme -> Duplicate Scheme

We will name our schemes as MyApp.testing and MyApp.production. Make sure to tick a shared checkbox while duplication schemes. Now for our schemes to load the desired .env files, we need to add a script to schemes.
Now select a scheme and open Build option and select Pre-Actions and select New Run Script Action and this line echo “.env.production > /tmp/envfile

While adding the script, carefully check the name of schemes and env file in the script. Now everything is set up in Xcode. Whenever we build the app selecting the scheme, it will just load the .env file associated with it.
Important Step- Now just move your Fastlane folder from your ios directory to the root directory of your project. We need this to be done because we have created our .env files at the root directory.
How to modify Fastlane files
1. Appfile – Appfile will look something like this:
app_identifier("com.example.MyApp") # The bundle identifier of your app apple_id("[youremailid@email.com](mailto:pratik@particle41.com)") # Your Apple email addressitc_team_id("YOUR_APP_STORE_CONNECT_ID") # App Store Connect Team ID team_id("YOUR_DEVELOPER_ID") # Developer Portal Team IDFor more information about the Appfile, see: [https://docs.fastlane.tools/advanced/#appfile] (https://docs.fastlane.tools/advanced/#appfile)
Now we have moved this information in our env file so will modify our Appfile:
xapp_identifier(ENV['APP_IDENTIFIER']) # The bundle identifier of your app apple_id(ENV['APPLE_ID']) # Your Apple email addressitc_team_id(ENV['ITC_TEAM_ID']) # App Store Connect Team ID team_id(ENV['TEAM_ID']) # Developer Portal Team ID
# For more information about the Appfile, see:
[https://docs.fastlane.tools/advanced/#appfile] (https://docs.fastlane.tools/advanced/#appfile)
for_platform :ios do for_lane :beta do app_identifier ENV['APP_IDENTIFIER'] end end
We have 3 different apps for each environment, which is why we have added a beta lane in Appfile to choose the app identifier from our .env file.
2. Fastfile – Fastfile will look something like this:
# Uncomment the line if you want fastlane to automatically update itself # update_fastlane default_platform(:ios)
platform :ios do desc "Push a new beta build to TestFlight" lane :beta do increment_build_number(xcodeproj: "MyApp.xcodeproj") build_app(workspace: "MyApp.xcworkspace", scheme: "MyApp") upload_to_testflight end end
Now we will modify it per our needs. Let’s go step by step –
# Uncomment the line if you want fastlane to automatically update itself # update_fastlane
default_platform(:ios)
platform :ios do desc "Push a new beta build to TestFlight" lane :beta do
ensure_git_branch(branch: ENV["BRANCH_NAME"]) ensure_git_status_clean
First, we will add git specific things, these are all actions we adding in Fastfile, you can check all available actions here.
Now ensure_git_branch will always ensure that we are on the specific environments branch for which we are building the app. And ensure_git_status_clean will always ensure that we don’t have any uncommitted code in our current branch:
get_certificates # invokes cert get_provisioning_profile # invokes sigh
This will get your certificates and provisioning profile associated with your developer account. You can read more about it here and here.
app_version = latest_testflight_build_number(version:ENV["APP_VERSION"],app_identifier:ENV["APP_IDEN increment_build_number( xcodeproj: "./ios/MyApp.xcodeproj", build_number: app_version+1 )
With latest_testflight_build_number we can get our current app version already uploaded to Testflight.
Now we will pass this number to the increment_build_number action and increment it by 1.
identifier = CredentialsManager::AppfileConfig.try_fetch_value(:app_identifier)update_app_identifier(xcodeproj: "./ios/MyApp.xcodeproj", plist_path: "MyApp/Info.plist", app_identifier: identifier)
Above we are fetching app_identifier from Appfile and updating it inside our Xcode project and .plist file:
update_info_plist( xcodeproj: "./ios/MyApp.xcodeproj", plist_path: "MyApp/Info.plist", display_name: ENV["APP_NAME"] )
We also need to update our App name in our .plist file:
api_environment = ENV["ENV"] scheme = "MyApp.#{api_environment}" if api_environment == "dev" scheme= "MyApp" end
We need the correct scheme while building our app. But because our local or the development environment doesn’t have an extension, we have added if condition here:
build_app( export_xcargs: "-allowProvisioningUpdates", workspace: "./ios/MyApp.xcworkspace", scheme: scheme, ) upload_to_testflight( app_identifier: identifier, skip_waiting_for_build_processing:true )
Now we will build the archive and upload it to Testflight. All the above actions will create some files like archive, provisioning profile, certificates that we don’t need in our project folder and we will need to delete. Don’t worry we don’t need to clean it manually, Fastlane is here to help!
clean_build_artifacts notification(subtitle: "Finished Building", message: "App uploaded")
We’re done. We have successfully uploaded the app, but also cleaned the project and have been notified as soon as the app uploaded to Testflight.
Our complete Fast file should look like this:
# Uncomment the line if you want fastlane to automatically update itself # update_fastlane
default_platform(:ios)
platform :ios do desc "Push a new beta build to TestFlight" lane :beta do
ensure_git_branch(branch: ENV["BRANCH_NAME"]) ensure_git_status_clean get_certificates # invokes cert get_provisioning_profile # invokes sigh app_version = latest_testflight_build_number( version:ENV["APP_VERSION"], app_identifier:ENV["APP_IDENTIFIER"] )
increment_build_number( xcodeproj: "./ios/MyApp.xcodeproj", build_number: app_version+1 )
identifier = CredentialsManager::AppfileConfig.try_fetch_value(:app_identifier) update_app_identifier( xcodeproj: "./ios/MyApp.xcodeproj", plist_path: "MyApp/Info.plist", app_identifier: identifier )
update_info_plist( xcodeproj: "./ios/MyApp.xcodeproj", plist_path: "MyApp/Info.plist", display_name: ENV["APP_NAME"] )
api_environment = ENV["ENV"] scheme = "MyApp.#{api_environment}" if api_environment == "dev" scheme= "MyApp" end build_app( export_xcargs: "-allowProvisioningUpdates", workspace: "./ios/MyApp.xcworkspace", scheme: scheme, )
upload_to_testflight( app_identifier: identifier, skip_waiting_for_build_processing:true )
clean_build_artifacts notification(subtitle: "Finished Building", message: "App uploaded") end end
Now we can use the below commands to run the Fastlane scripts –
1. Development- fastlane ios beta
2. Testing- fastlane ios beta --env=testing
3. Production- fastlane ios beta --env=production
Also, we have config set up so we have to use the below commands to run our app on simulator or device.
1. Development- npx react-native run-ios
2. Testing- ENVFILE=.env.testing npx react-native run-ios --scheme "MyApp.testing"
3. Production ENVFILE=.env.production npx react-native run-ios --scheme "MyApp.production"
Bonus tip – If it’s difficult to enter such big command in the terminal just to run the app, we can add it this command to our package.json the file inside our script tag:
"scripts": { "start": "react-native start", "test": "jest", "lint": "eslint ." "run-dev-ios": "npx react-native run-ios" "run-testing-ios": "ENVFILE=.env.testing npx react-native run-ios --scheme "MyApp.testing" "run-production-ios": "ENVFILE=.env.production npx react-native run-ios --scheme "MyApp.production" },
Now while running we just need to enter npm run and script name as:
npm run run-testing-ios
Feel free to give any suggestions or to ask any questions in the comments.